New Construction Horizontal Fire Stop Firestop
- Brand
- New Tech Industries
- SKU:
- SF
- Condition:
- New
- Shipping:
- Calculated at Checkout
New Construction Horizontal Fire Stop Firestop
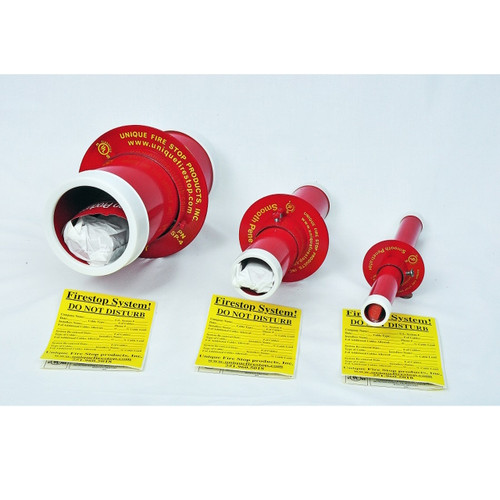
The Smooth Penetrator is used in new horizontal cable installations for walls rated up to 2 hours. No caulk is required between the sleeve and the wall. Our most economical product, it makes firewall penetrations neat, clean, and efficient. This design allows for cDon’t be fooled by similar looking products of lower quality. This is the original UNIQUE Smooth Firestop Sleeve System. Designed to act like a “roller” in the firewall allowing the installer to pull cables through unattended even at a 45 degree angle . A real time saver!
Our most economical product, this System makes firewall penetrations neat, clean, and code-compliant. The wall will be fire stopped and smoke sealed 100% of the time. Product comes with everything you need in one system including our UNIQUE Intumescent Putty.
A pair of highly visible documentation/warning labels records cable count, size, installer’s info and the applicable UL Listing # and are used for digital documentation of your installed system.
ables to be pulled through the firewall without any "attendance", even at a 45 degree angle. The sleeve acts like a roller in the wall while cables are being pulled. A real time saver!
Intumescent putty is included. Fire stopped and smoke sealed 100% of the time.
Systems available in 1, 2, & 4 inch diameters.
| Smooth Penetrator System Specs and Cable Load Chart | |||||||||||
| Part# | Product | Weight | Length | Diameter | Hour Rating |
48% Fill Capacity with our putty | |||||
| I.D. | O.D. | Cable Dia. (.20") |
Cable Dia. (.25") |
Cable Dia. (.40") |
Cable Dia. (.50") |
||||||
| SP-1 | 1" Smooth Penetrator | 1 lb. | 12" | 1" | 1 3/16" | 1 or 2 | 12 | 7 | 3 | 2 | |
| SP-2 | 2" Smooth Penetrator | 3 lbs. | 12" | 2" | 2 5/16" | 1 or 2 | 48 | 30 | 12 | 7 | |
| SP-4 | 4" Smooth Penetrator | 8 lbs. | 12" | 4" | 4 1/2" | 1 or 2 | 190 | 120 | 48 | 28 | |
Our systems come with enough Putty for a minimum 25% and maximum of 48% cable load.
Systems are powder coated RED - accept no substitutes!
ASSEMBLY INSTRUCTIONS:
Determine the System size and penetration point that you want to make in the firewall. See the Cable Load Chart.
Up to 48 % of the aggregate cross-sectional area of the Sleeve System may be filled with cables in walls rated up to 2 hours. The remaining void should be filled with UNIQUE Intumescent Putty, supplied with the Sleeve System.
Find the applicable UL Listing for your Installation. Look carefully at the illustration ‘Calculating % Fill’.
Disassemble the System and remove one end’s bushing by loosening the sliding lock couplings and using the hardware to ‘slide hammer’ the bushing off of one end of the Sleeve. This will prevent damage to the bushing. Be careful when installing the bushing after the Sleeve System is in the wall- it can shatter!
If you are installing more than a few Sleeve Systems, for sheet rock, you might consider a cordless drill (with level). Use the proper sized hole saws on 6 inch bit extensions. See the cable load charts for Systems outside diameter (O.D.). Block walls should be core drilled.
After the penetration is made, reassemble one side and slide the Smooth Firestop Sleeve through the wall, seating the first washer against the wall. Adjust the sliding set screw lock to equalize the length of protrusion. As long as the hole is the same as the O.D. of the sleeve, no caulk is required behind the washers.
Go to the other side of the firewall, slide the washer over the system, and seat it against the wall. Slide the second sliding lock coupling up to the second washer. While pulling on the System, push the second lock coupling against the washer/wall until it seats. Lock down the sliding lock couplings and carefully install the plastic bushing on the end.
The Sleeve can now be used to pull your cables through the wall and on to their destination. UNIQUE Intumescent Putty for the sealing of our Systems is packaged with the Sleeve. For the Fill Void or Cavity Material, refer to the applicable UL Listing.
| The UNIQUE Smooth Firestop Sleeve System consists of: A 12 inch length of EMT, (2) large washers, (2) sliding compression couplings, (2) plenum rated bushings, a pair of documentation/warning labels and a package of UNIQUE Intumescent Putty. | |
 |
You should use a drill with a level. This will make your Sleeve System install nice and straight! |
 |
A 6 inch bit extension for your hole bits works very well. Be wary of what might be in the walls. |
 |
You might use one of the washers to mark your hole. Now drill your perfectly straight hole. |
 |
Adjust the hardware to allow for equal protrusion on both sides of the wall. Insert the first half of the System in the hole you made. There is no need for any caulk between the sleeve and the wall (behind the washers). Go to the other side … |
 |
On the other side of the wall, install the washer, sliding compression coupling and bushing. While holding the sleeve firmly in the wall, tighten the set screw on the sliding compression coupling. Now you may use the sleeve system as if it were a roller in the firewall, allowing you to pull cables ‘unattended ‘. This is a real time saver! |
 |
Tear the intumescent putty supplied with the system in half. You will need to apply an inch thickness to each end. If you do not have enough putty, you may purchase an extra Fill Kit. It is an 18 cubic inch stick of UNIQUE Intumescent Putty. |
 |
When the cables reach their destination, install an inch thickness of the supplied UNIQUE Intumescent Putty. Alpha numerically ID your installation. Be sure to fill out and apply the labels. Take a picture of your installed System! |


