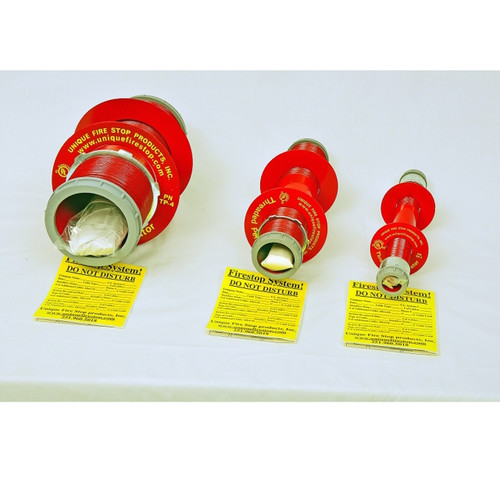
Threaded Firestop Sleeve System
- Brand
- New Tech Industries
- SKU:
- TF
- Condition:
- New
- Shipping:
- Calculated at Checkout
Threaded Firestop Sleeve System
Threaded Firestop Sleeve is used for new cable installations through a cinder block, cement or masonry firewall or floor. UL Classified for up to 4 hours horizontal and 3 hours vertical. Designed for new cable installations where the hole through the firewall or floor is precut. Firestops horizontal or vertical cable installations in concrete or masonry. Our most ROBUST Sleeve System.
System Contents:
Product includes everything you need, including intumescent putty.
1 – 12″ threaded IMC sleeve
2 – large flat washers
2 – threaded couplings
2 – plenum rated bushings
2 – documentation/warning labels
1 – UNIQUE Intumescent Putty
| Threaded Sleeve System Specs and Cable Load Chart | |||||||||||
| Part# | Product | Weight | Length | Sleeve Diameter |
Hour Rating |
48% Cable Fill for 2 hr. & Vertical Systems / 34% Cable Fill for 4 hr. Systems |
|||||
| I.D. | O.D. | Cable Dia. (.20") |
Cable Dia. (.25") |
Cable Dia. (.40") |
Cable Dia. (.50") |
||||||
| TF-1 | 1" Threaded Sleeve | 2 lbs. | 12" | 1" | 1 1/4" | 1-2-3-4 | 12 / 8 | 7 / 5 | 3 / 2 | ||
| TF-2 | 2" Threaded Sleeve | 4 lbs. | 12" | 2" | 2 5/16" | 1-2-3-4 | 48 / 34 | 30 / 21 | 12 / 8 | 7 / 5 | |
| TF-4 | 4" Threaded Sleeve | 8 lbs. | 12" | 4" | 4 1/2" | 1-2-3-4 | 190 / 135 | 120 / 85 | 48 / 34 | 28 / 20 | |
Assemblynstructions
Determine sleeve size and penetration point that you want to make in the firewall/ floor. Ensure hole will accept the outside diameter of System to be used. Example: 4″ Threaded Sleeve outside diameter is 4.5 inches.
Up to 48% of the aggregate cross sectional area of the sleeve may be filled with cables if the system is used vertically or horizontally for up to 2 hours. The 4 hour listing is limited to 34% cable load. The remaining void should be filled with an intumescent fill material and/or mineral wool.
Disassemble the system leaving one coupling and bushing on the sleeve at about the right depth for your firewall/floor to equalize the protrusion on both sides. Slide the washer on the sleeve while installing the top or first side of the sleeve in the wall/floor. Push assembly firmly against wall/floor, seating the first washer. Install the plastic bushing.
Go to the other side of the firewall/floor and slide the washer over the system and seat it against the wall/floor. Thread the second coupling up to the second washer. While holding the system, tighten by hand until sleeve is firmly in place. Install the remaining bushing on the sleeve.
Route cable through the system and pull it on to its destination. Document the installation with the supplied warning label. Refer to other tabs on this page for Fill Charts, Installation Pictorials, and UL Listings.


