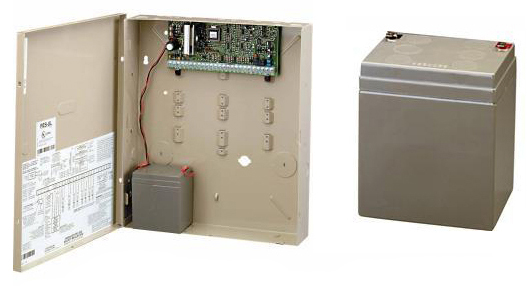
Honeywell Vista 20P Control Panel: How to replace the Battery.
How Do You Replace the Battery in the Vista 20P Control Panel?
Just like any other control panel of an alarm system, the Honeywell Vista 20P control panel is also equipped with a battery. So in case the home’s electric lines fail, the Vista 20P control panel will use the battery for backup power. For Honeywell control panels, batteries need to be replaced between 3 to 7 years. If you have proper tools, then you can replace the Vista 20P battery yourself. There are no special skills required to do this. If you do everything properly, the control panel and alarm system will not be damaged in any way.
The following are the steps you will need to follow in order to
replace the Vista 20P control panel battery. It is recommended that you warn the off-site
monitoring service before you disconnect your alarm system for battery
replacement.
1. Purchase a
New Battery
Obviously you will need to purchase the replacement battery
which is compatible with the control panel. You can acquire the replacement
battery from the same place as where you purchased the Honeywell Vista 20P control panel.
2. Disarm the
Alarm System
Now that you have the replacement battery and the necessary
tools, you can disarm the alarm system to proceed with the battery replacement.
Input your password into the keypad and disarm your alarm system. It is also
recommended that you trip the circuit breaker that is supplying power to the
control panel.
3. Open the
Control Panel Box
If your Vista 20P control panel box is locked, then first unlock
it with the required key. Then use a compatible screwdriver to remove the
screws. You should remove all the screws around the control panel. Once all the
screws are removed, pull the cover off the control panel.
4. Remove the
Old Battery
Now disconnect the wires from the old battery that is
attached to the control panel. It is recommended that you use pliers with
insulated handles to ensure safety. After disconnecting the wires, carefully
remove the battery out of the control panel to avoid a short.
5. Place the
Replacement Battery
Take off the terminal protector of the replacement battery. Connect
the black wire to the negative terminal and the red wire to the positive
terminal. It is recommended that you connect the wire to the positive terminal
first. Now place the replacement battery in the same position in the control
panel box as the old battery did. Also loosen the screw tabs located at the top
of the battery.
6. Close the
Control Panel Box
Now that the replacement battery is successfully installed, it’s
time to close the control panel box. Place the cover back on the Vista 20P
control panel and use the screwdriver to reattach all the screws.
7. Restore the
Power
Restore the electric power to the control panel.
8. Initialize
the Alarm System
Once the power is restored, use the keypad of the control panel to enter the password and initialize the alarm system. It is recommended that you reset the alarm system via the ‘Reset’ menu of the control panel.

